Saturday, November 10, 2012

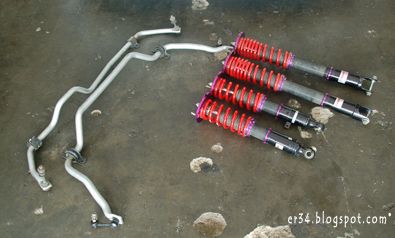
Trust GReddy Performance Damper Type S and Nismo S-Tune Stabilizer Bars


Pic 1: Trust GReddy Performance Damper Type S and Nismo S-Tune Stabilizer Bars

I haven't do any upgrades to the ER34's handling for quite a long while. I've always wanted to change to thicker anti roll bars / sway bars for the ER34 and also to upgrade to better coilovers than the current set of Tein Super Street.

After years of using the Tein Super Streets, it's now got improved parts replacing it. In comes the below:-

1) Trust GReddy Performance Damper Type S
2) Nismo S-Tune Front Stabilizer Bar / Sway Bars / Anti-Roll Bars
3) Nismo S-Tune Rear Stabilizer Bar / Sway Bars / Anti-Roll Bars

The Trust Greddy Type S Performance Damper is a monotube coilovers produced in accordance with racing driver Takeshi Tsychiya. The features are as below:-

- Advanced Monotube design
- Screw type adjustment for increased accuracy
- Strengthened rubber upper mounts for improved rigidity
- Lightweight aluminium brackets to reduce weight over standard components
- Lightweight specially designed and manufactured high tensile steel spring
- Spring rates are Front: 8 kg/mm and Rear: 6 kg/mm


Pic 2: About to be installed

The pair of NISMO S-Tune Stabilizer Bars are thicker in diameter compared to stock factory ones and also comes with Nismo heavy duty bushes. The stabilizers have the below specifications:-

Front Spring Rate - 3.6kgf/mm, Thickness - 27.2mm
Rear Spring Rate - 4.4kgf/mm, Thickness - 23.0mm

I reckon this new combo should be much better yet retains the daily drivebility of the ER34. 

With this done, it would also means that my set of Tein Super Street is now up for sale. Bought brand new and is in mint condition. No knocks and leaks. Let me know you are interested in the set.


Pic 3: The Trust GReddy Performance Damper Type S installed

Pic 4: Installing the NISMO S-Tune Stabilizer Bars
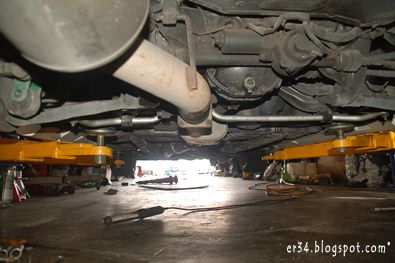
Pic 4: NISMO S-Tune Stabilizer Bars installed

Pic 6: The stock stabilizer bars

Pic 7: My set of Tein Super Street is now up for sale
      

Tuesday, October 16, 2012

The Rising Sun Flag

I used to have a small Rising Sun Flag on the ER34 back in 2006. It was removed about two years ago to make way for another decal. So recently, an idea struck me and I've again, decided to have a replacement Rising Sun Flag.

This time around, it's going to be a bit different. I'm placing it on the fuel flap cover. The car being in solid white will form part of the canvas, thus only red decals are applied.

Below are how it looks like. Hmmm......rice or nice?


Pic 1: The Rising Sun Flag up close


Pic 2: A further shot


Pic 3: How it looks like as a whole


Saturday, October 06, 2012

Superior Auto Creative Carbon Look Boots


Pic 1: Superior Auto Creative Carbon Look Boots

I had some carbon look fabrics from Hippo Sleek to replace my Gear Lever Boot and Hand Brake Lever Boot back in October 2007. Well, after so many years, it has really started to show wear and tear. The fabric is starting to break apart!

I left it as it is for quite a while before I got to order in some replacements. This time round, I ordered from Superior Auto Creative instead. Took them 3 weeks to dispatch these out for me. I ordered the:-

1) Superior Auto Creative Carbon Look Shift Boot
2) Superior Auto Creative Carbon Look Side Brake Boot
3) Superior Auto Creative Carbon Look Side Brake Grip

Basically I only really need the Side Brake Boot but I got the Side Brake Grip as well thinking it'll match better. It turns out to be just a slot in cover. Not the kind of fitment I'm satisfied with but it's already here so in it goes. Not really satisfied though.

As for the Shift Boot, it's just to complement the rest of the items I guess. Anyway, here are pics of the parts and how it looked like installed. 
 

Pic 2: Superior Auto Creative Carbon Look Shift Boot
 

Pic 3: Superior Auto Creative Carbon Look Side Brake Boot


Pic 4: Superior Auto Creative Carbon Look Side Brake Grip


Pic 5: Before installation


Pic 6: After all is installed


Thursday, September 27, 2012

HKS Racing Suction Kit

 Pic 1: HKS Racing Suction Kit

Just got hold of the HKS Racing Suction Kit (Part No. 70020-AN009) for the ER34. This replaces the factory rubber intake piping with a aluminum mandrel bent suction pipe that have been tested for optimal air flow. 


 Pic 2: HKS Racing Suction Kit

To install the HKS Racing Suction Kit, it takes quite a fair bit of work. Lot of pipe work needs to be removed to make way to reach the turbine. And of course, the air filter and AFM are also taken out. The suction kit needs to go all the way in and connects the turbine inlet to the AFM and air filter.

Air flow would be heaps better but the most significant difference to me was the sound it makes! When I lift off the throttle, it produces a series of "woo, woo, woo, woo" noise. Pretty sick me think.

 Pic 3: Removing the pipings


Pic 4:The factory pipe


 Pic 5: This is where the HKS Racing Suction Kit sits

 Pic 6: Installed pic


 Pic 7:A better view


Sunday, September 23, 2012

119,000km Service

 
Pic 1: Bunch of Torco and Redline oils

The ER34 has just undergone it's 119,000km service. Fresh fluids in the form of Torco SR1 10W-40 went in together with an original Nissan oil filter (Part No. 15208-53J00). I also replaced the aging transmission oil with the same Redline Lightweight Shockproof Gear Oil. These have proven to work great for me hence am still sticking to it.

It's been a while since I've changed the differential oil, hence took the opportunity to replace it with Motul Gear SAE80 W140 oil.

Most of the fluids are now fresh. Should feel good.


Pic 2: Motul Gear SAE80 W140

Pic 3: Engine Oil Change

Pic 4:Transmission Oil Change


Monday, August 06, 2012

Veilside VS D1-GT Carbon Fibre Hood & Aerocatch


Pic 1: ER34 with Veilside VS D1-GT Carbon Fibre Hood & Aerocatch

In continuation from my previous entry on "Bodykit Options for The ER34", I've finally decided to go the easy route that cause me the least amount of downtime on the car usage and also one of the more cost effective options. 

I've decided to just install the ultra rare Veilside VS D1-GT Carbon Fibre Hood and also Aerocatch locking decide to secure it down.

Before fitment, I sent in the hood to have it re-lacquered to give it that brand new look. I've also repainted the underside of the hood. Yes I know no one see underneath but I like everything to look good inside out. Cost me a fair bit as I use good lacquer that are able to withstand the hot Malaysian sun. Slap on a couple of layers too for good measure. The end result is pretty nice. :)


Pic 2:The vents


Pic 3: ER34 with Veilside VS D1-GT Carbon Fibre Hood

Initially I have my doubts on the hood as it's a tad too aggressive looking for me. After fitting in, it took me a while to get used to it. Something new to me to be able to see vents staring at me from the drivers seat. After driving it for sometime, I guess I've now gotten pretty much accustomed to it. Also getting 'friendly' with the white car, black hood look. Not particularly fond of it yet though.


Pic 4: The view underneath


Pic 5: Yes, it is an original Veilside item

With the hood on, it's a good idea to have additional securing device aside from the stock factory catch. Being so much lighter than the original hood, chances of it catching air and lifting up is not something unheard of. Plenty of cases where FRP/CF hood flew out from the catch and slam onto the windscreen and roof. I am not about to take those chances at all.

Traditional hood pins? Nah, those are so old skool already. Nowadays everyone uses Aerocatch. Even race teams in Le Mans uses them. But make sure you get the original Aerocatch as the market is flooded with cheap knock-offs. For additional strength, I also fitted in the optional Aerocatch Fixing Nut Plate Kit. This is basically an additional 'ring' of aluminum fitted underneath the hood for added mounting strength. 

Here are some of the pics. So what do you think? 


Pic 6: Vents


Pic 7: More vents. These are pretty unique
 

Pic 8: Drilling hole for the stud strikers


Pic 9 And another one


Pic 10: Stud strikers and bump stops fitted


Pic 11: How Aerocatch looks underneath with the
Aerocatch Fixing Nut Plate Kit


Pic 12: All fitted and ready to go


Pic 13: All done up


Saturday, August 04, 2012

HKS Super Filter element change


Pic 1: HKS Super Filter

I didn't change the filter on my HKS Super Power Flow DD (Direct Drive) for ages. So long in fact, I was utterly surprised to find it already broken down. A large chunk of the filter has already disintegrated!

Quickly went to get a replacement and in goes the dry 3 layer HKS Super Filter. Wanted any other colour other than green but fortunately that's what they have in stock. I need it in a hurry thus didn't order it in myself. 

Did a quick change and now it looks and performs better. :)


Pic 1: This is how bad it looks


Pic 1: You can see clearly the three layers


Pic 1: All fitted in and ready to be back in the car 


Tuesday, July 24, 2012

Do-Luck Rear Tension Set


Pic 1: Do-Luck Rear Tension Set

In addition to the Do-Luck Rear Cross Bar, I've finally gotten my hands on the Do-Luck Rear Tension Set. The Rear Tension Set comprised of the Rear Tension Cage and Rear Tension Bar. The Rear Tension Cage are the bars that forms a "U" shape and connects the left and right side of the car via the seat belt points. The Rear Tension Bar further connects the Rear Tension Cage to the rear parcel shelf of the car.


Pic 2: Do-Luck Rear Tension Set

Basically this is a set of rollcage-like bars that strengthen the car and prevent flexing of the chassis. Do-Luck never did make a set for the ER34, only the BNR34 ones are available. A couple of years ago, I've contacted Do-Luck and was told that it will not fit the ER34 due to some missing screws on the ER34 chassis.They couldn't tell me exactly that is required to make it fit thus I've just left it as that. I had the Do Luck Rear Tension Set back then and decided to sell it off due to such.

Until recently, I managed to get my hands on another set of the Do-Luck Rear Tension Set. I've now decided to study it more thoroughly and see it for myself what are the differences. Comparing an ER34 and a BNR34 side by side, the only differences that I spot are:-

1) BNR34 have an extra rear suspension top brace that the ER34 does not have.
2) BNR34 have 2 extra screws beneath the speaker board that the ER34 does not have.

Best is to refer below pictures for a better idea of the difference.


Pic 3: ER34 Rear Parcel Shelf


Pic 4: BNR34 Rear Parcel Shelf

So, it's just 2 minor differences. Not really a problem. All I've got to do now is the order the top brace from Nissan Japan and figure out how to get those 2 screws onto the rear parcel. Shouldn't be too hard I suppose. 


Pic 5: BNR34 Rear Suspension Top Brace


Prior to fitment, I need to procure the missing screws. Originally from the factory are M8 screws; but I decided to go for the bigger M10 screws. They are bigger, hence a bit stronger I guess. These fit perfectly into the screw holes on the Rear Tension Bars.


Pic 6:
Welding the Screws onto the Rear Suspension Top Brace

As the rear parcel shelf does not have holes for the screw to go through, it will have to be welded on the suspension top brace plate. Then holes will need to be punched on the rear parcel shelf for the screw heads to go through. And finally, the rear suspension top brace will be welded on the rear parcel shelf.


Pic 7:
Marking the holes on the rear parcel shelf where the screws heads will land


Pic 8:
Trial fitment

When that is done, the whole 'cage' will be able to fit in easily. The other only downside is that the speaker board will need to be trimmed to allow the Rear Tension Bars to go through. No escape in that so one got to do what one has to do. The rear seats will still fit hence no issue when the need arises to fetch more than one person.

After fitment, besides looking really awesome is that the ride seems to be a bit stiffer. Now this is going to affect my suspension plans. I have already gotten a couple of suspensions for the ER34. Not too sure which set I should fit in at the moment. Yeah, I know, it's just like my case with the "Bodykit Options For the ER34" entry. Can't decide hence bought a few sets. LOL :P

Being shiny aluminum, it's quite visible from the rear, hopefully I don't get in trouble with the law, else it's going to be really tough on the wallet!


Pic 9:
The view from the rear

Here are some fitment pictures:- 


Pic 10:
Fitting in the Do-Luck Rear Tension Cage


Pic 11:
Do-Luck Rear Tension Bar


Pic 12:
Do-Luck Rear Tension Bar


Pic 13:
Do-Luck Rear Tension Set fitted


Pic 14:
Do-Luck Rear Tension Set fitted


Pic 15:
Do-Luck Rear Tension Set fitted
 

Pic 16:
Do-Luck Rear Tension Set fitted


Related Posts with Thumbnails