Showing posts with label ER34. Show all posts

Monday, October 21, 2013

BNR34 V-Spec II Nur Steering Wheel


The old steering wheel on the ER34 is starting to get a bit worn out due to age and usage. Now I am not a fan of plastering GT-R emblems on the car or to convert it to look like a GT-R but this is perhaps too good of an opportunity to let go.

Via JDM Auto Link, I've got this literally like-new steering wheel removed from the BNR34 V-Spec II Nur. It's like exactly how it left the factory! It definitely have only seen very limited mileage as there wasn't a single blemish on it. The Nur steering wheel differs from the normal GT-R with it's silver stitching instead of red ones on the GT-R.

This steering wheel plugs right in and certainly feels much better than my old worn unit. Yeah, I have a GT-R logo on the car now, nothing much I can do about that unfortunately. Aftermarket wheels are not an option as I would like to retain the airbag function. So I guess this will do just fine. :)


Thursday, October 17, 2013

124,000km Service


It's time for a service again but this time round, it's a lot more hurtful to the wallet. Besides the obligatory Torco SR1 10W-40 and a Nissan oil filter (Part No. 15208-53J00), I got the HKS GT-RS turbine rebuilt as well. It well sort of uhm ..... blew up. 

So it was removed and sent to an authorized Garrett distributor to be looked into. A new Garrett CHRA GT2871R was ordered and in it went into the HKS GT-RS housing. That certainly put a huge dent on my wallet but at least it's now as good as new, literally. 

With my new Tommy Kaira Digital Meter Cluster, the mileage now actually reads 108,000km. Will be using this reading from my onwards.  


Sunday, October 06, 2013

SplitFire Super Direct Ignition System

 
Pic 1: SplitFire Super Direct Ignition System 

Most Skyline owners upgrade the factory coilpacks to better aftermarket ones. Usually the brand of choice would either be Splitfire or Yellow Jackets. Both are equally good in terms of performance. Splitfire is from Japan where as Yellow Jackets are from Australia. The Australian product is slightly cheaper but offers the same performance.

My ER34 have been running the stock coilpacks for a long time with no issue whatsoever. I always have had a spare set of mint pre-owned Splitfire coilpacks lying around so finally I thought why not just install it already.

The SplitFire Super Direct Ignition System replaces the original equipment coilpacks with a direct ignition coil on plug system. This will:-

- Increases horsepower at the top end of the RPM band 
- Ensures and maintains maximum energy supplied to the spark plugs 
- Reduces incomplete combustion caused by misfire 
- Eliminates RFI (radio frequency interference)

Fitment of the coilpacks are kind of troublesome as a lot of pipings need to be removed in order to access it. But aside from that, it's as easy as unplugging the stock ones and plugging in these Splitfire. Purely plug and play. This should give the ER34 better sparks. :)

Pic 2: Removing the stock coilpacks

Pic 3: SplitFire Super Direct Ignition System installed

Wednesday, October 02, 2013

Tommy Kaira 25R Digital Meter Cluster


Pic 1: Tommy Kaira 25R Digital Meter Cluster

Ever since I got the ER34, I've been looking for the Tommy Kaira 25R Digital Meter Cluster. It's basically a stock meter cluster but embedded in it is the speedometer in digital format instead of an analogue dial. In addition, it also have warning lights to indicate "Peak Torque" and "Shift Up Point".

As you can imagine, this meter cluster is as rare as hen's teeth! These were only found in Tommy Kaira 25R. And only 163 units were ever made. From this number it is again divided in to automatic transmission and manual transmission version. During the course of these few years, I've managed to track down a couple of automatic transmission meter cluster but not the manual version until now. And boy does it cost me! Paid mighty good money for it.


Pic 2: Tommy Kaira 25R Digital Meter Cluster

Actually I've also gone to the extend of requesting Tommy Kaira to produce the meter but they rather not entertain my request unfortunately. 
  
Anyway, when the Tommy Kaira 25R Digital Meter Cluster arrived, I got it fitted onto the ER34. Looks good but one major issue. The calibration is totally off. It's reading perhaps around 4 times the actual speed. And I hit the speed limit of the meter cluster easily, at a speedy 400km/h. :P

There are some work around ways to this after consulting a mate in Australia that have had the same issue. I'll need to sent it to a instrument specialist. They will hook up the meter cluster to two devices called SINE Wave Electronic Ratio Box. One each for the speed reading and  the odometer reading. 

Before I courier down my meter to those guys in Australia, I looked around my part of the world and thankfully, a friend here can get it done for me. And I do not need those SINE Wave Electronic Ratio Box. The Tommy Kaira 25R Digital Meter Cluster will be worked on directly. The meter cluster was disassembled and long story short, I got it back after a couple of months. It's working great!


Pic 3: Tommy Kaira 25R Digital Meter Being Worked On


Pic 4: Tommy Kaira 25R Digital
Meter Being Worked On 

Here is how it looks fitted in.


Pic 5: Tommy Kaira 25R Digital Meter Cluster Fitted In

Tuesday, July 23, 2013

Cusco Rear Brace


Pic 1: Cusco Rear Brace

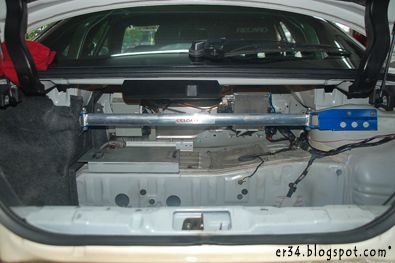
Just got the Cusco Rear Brace fitted to the ER34. It's supposed to tie in the rear and provide that extra bit of rigidity. It's plug and play thus no holes needs to be drilled but being the fitting position is in the boot/trunk of the car, some carpet would need to be trimmed to make way for the bar.

Nothing major, just need to make some slits for the bar to pass through behind the trimmings. One disadvantage about this bar is that the parcel shelf in the trunk would not be accessible anymore as the bar is smack in the middle blocking access to it. I guess some trade-off needs to be made.

Below are pictures of the install to give a clearer understanding.

Pic 2: Cusco Rear Brace

Pic 3: Cusco Rear Brace

Pic 4: Mounting point


Pic 5: One side with carpet trim and another without


Pic 6: Carpet trim back on


Pic 7: This is how it looks like when finally fitted

Friday, May 24, 2013

BNR34 Multi Function Display (MFD) into the ER34


Pic 1: The Multi Function Display (MFD) set

Been wanting to get the Multi Function Display (MFD) off the Nissan Skyline R34 GT-R (BNR34) into my ER34 for the longest time. Finally I got it done and boy does it totally transform the interior of the car. Those triple meters are removed and in goes the MFD which fits perfectly on the dashboard. 

There would be a bit of wiring to be done but nothing too major as wiring diagrams are available off the internet. And in my case, my set already come with the proper wirings all done and labelled by the Japanese chap I got it off from. So fitment wise was a bit easier.

With those trick MFD displays, the ER34 now looks a tad more modern and the most important thing is that I don't need those external gauges as it displays:-

Boost pressure
Throttle position
Injector duty
Oil temperature
Water temperature
Exhaust temperature
Intake temperature

Well, for now I only have the first five parameters displayed as I do not have sensors for the exhaust temperature and intake temperature. Perhaps one day I'll hook those up to complete up the display.

My MFD is off a late model R34 GT-R, hence it uses the Toshiba LCD screen instead of the earlier model Sharp LCD screens. Should be much more robust as the Sharp LCD screen tend to develop display problems due to age. 

Below are some pictures that were taken during the install.  

 
Pic 2: The Multi Function Display (MFD) set 

 
Pic 3: The Multi Function Display (MFD) unit

 
Pic 4: The Multi Function Display (MFD) cover

 
Pic 5: The Multi Function Display (MFD) wirings and sockets

 
Pic 6: Triple meter and AC vents are removed

 
Pic 7: Wiring it into the ER34 wiring harness

 
Pic 8: Wiring it into the ER34 wiring harness

 
Pic 9: Wiring work


Friday, March 15, 2013

Rocker Cover Gasket & Crank Oil Seals


Pic 1: Removing the rocker covers

Recently notice that the ER34 have a wee bit of oil leak. It's actually quite minor to the point there isn't even oil stains on the floor where I usually park. Nevertheless, it needs to be looked into.

I got new Nissan Rocker Cover Gasket (Part No. 13270-58S01 & 13270-58S11) and also three new Nissan Crank Oil Seals (Part No. 13510-50B10) to replace the old ones. After the replacement, I got the stains on the engine bay cleaned and it's all back to its old good self. :)


Pic 2: Nissan Rocker Cover Gasket & Crank Oil Seals


Pic 3: Oil Leak!


Pic 4: Oil Leak!


Pic 5: New Rocker Cover Gasket


Tuesday, March 05, 2013

IMPUL Emblem


Pic 1: IMPUL Emblem

I've been looking for this IMPUL emblem for quite a long time and finally got my hands on one. Needless to say this is a pretty rare find. Need it on my grille to add a complete touch to the IMPUL 534S bodykit. With the addition of this emblem, the front now looks more finished in my eyes.


Pic 2: IMPUL Emblem

This screws on the grille and thus is pretty secure to keep away peeps with itchy fingers, who loves to flick emblems.

Shall it be the only emblem on the car or do I need another lettered IMPUL emblem at the rear? I have actually bought the lettered IMPUL emblem and it's awaiting shipment in from Japan. Hmmm.....


Pic 3: Against the Grille


Pic 4: Halfway through fitment


Pic 5: Fitment Done


Pic 6:
Fitment Done


Pic 7: Frontal Look


Thursday, February 14, 2013

Rear BIOT 322mm Rotors Upgrade (Biot Offset Kit)

If you have followed my built, you'll notice that the braking system have been upgraded to BNR34 Brembos all round. The front got bigger rotors courtesy of the BIOT 345mm Front Brake Offset Kit. The rears remain the stock BNR34 Brembo rotors measuring 300mm.


Pic 1: Comparison between stock Brembo 300mm rotors with BIOT 322mm rotors

I always thought that the fronts fills up the wheels nicely while the rear is a tad small in size. The rear BNR34 Brembo rotors are 300mm rotors in size. As luck would have it,  JDM Auto Link finally sourced me a set of a BIOT Rear Brake Offset Kit that would bring the rotors up to 322mm. 

Although many might not have heard of BIOT, they makes excellent brakes, but does costs a lot as well. The BIOT Front Brake Offset Kit is JPY 160,000 new and the BIOT Rear Brake Offset Kit is JPY 90,000 new. Yikes!!

Anyway, I finally got the rotors fitted but not without some "massaging" of parts to make it fit/clear everything. Just like the fronts, the calipers needed to be grinded off a wee bit to clear the brackets. It's all hidden from view as it's at the back hence does not have any visual impact. The rotor brake duct covers/shields also need to be 'enlarged' to clear the rotors. Unfortunately, a small part of the knuckle would also need to be cut away.

Below are pictures of how it looks fitted. In all honestly, I would think it's still a bit small. Works great though. I wonder if I'll be satisfied or will go for even bigger brakes in the future......


Pic 2: Grinding off a bit of the rear calipers


Pic 3: Grinding off a bit of the rear calipers


Pic 4: Enlarging the brake duct cover/shield

 
Pic 5: Fitting in the brackets. Note a small part of the knuckle is cut off


Pic 6:
Fitting in the brackets


Pic 7: The end result


Pic 8: The end result

Related Posts with Thumbnails