Monday, May 21, 2007

Drive It Like You Stole It #05- Frasiers Hill

Yes, for Drive It Like You Stole It #05 (DILYSI), we went to my favourite route, Frasiers Hill!!!

The usual route is taken, i.e
Batu Caves - Ulu Yam - Kuala Kubu Baru - Batang Kali - The Gap - Frasiers Hill

Pic 1: The group enroute to Frasiers Hill

For this drive, we have 2 ER34, 2 Smart (a Roadster and a ForTwo), 1 WRX Sti Version 8 V Limited and 1 Satria GTi. It's interesting to note how the rest of the cars fare against the lighter and more nimble Smart.

While we were blasting considerable faster on Ulu Yam, Kuala Kubu Baru and on the Batang Kali road, the Smart proved it's capabilities on the twistier roads leading to The Gap and up to Frasiers Hill.

At some straighter stretch, the ER34s touched 200km/h!! That's madness on B-roads. Hahahaha......

I have to give it to the Smart; those lightweight small capacity turbocharged little midget of a car is crazy on the twisties. They can brake at the very last moment (at times no need to brake at all!) prior to charging into a tight corner. They can even stay in the middle of the road (on the dividing line) to overtake cars. :O

I even saw the ForTwo overtaking on the left via the road shoulder. Crazy dude!! Hahahaha

Pic 2: At Frasiers Hill
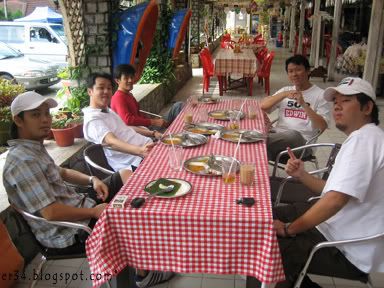
Pic 3: Time for breakfast

Upon reaching Frasiers Hill, we stopped at our regular stall for breakfast and a bit of a breather before we head back down. This 150km drive consumed quite a bit of petrol as I stayed on the higher revs most of the time. This trip took up 3/4 of my 65 litres fuel tank. Damn!!! :O

Here are some pictures of the day.....

Pic 4: The group at Frasiers Hill

Pic 5: At The Gap

Pic 6: Parked at The Gap

Pic 7: Jason ran out of water for his intercooler water spray yet again!

Pic 8: Don't mess with this Scooby

Pic 9: Waiting for the rest to regroup

Pic 10: A view of the lake

Friday, May 18, 2007

18 inch Work Emotion XD9 Wheels

Yes!!! I got new wheels!!! I ordered a set of the Work Emotion XD9 from Japan (many people think I’m mad to order all of my parts in myself ... hahaha). It took a bloody 6 weeks to arrive from the date of booking to arrival in Malaysia via ship. Damn! That’s a long wait..... :(

Pic 1: The Work Emotion XD9 packaging

I got the below specifications of the Work Emotion XD9:-
Front - 18×8.0JJ+35 5H-114.3
Rear - 18×9.0JJ+38 5H-114.3

Of course many know my dream wheels are the NISMO LMGT4 but with it costing twice as much for what I had purchased, that does not seem to be a possible choice. As of now, my bank account is already depleting faster than the Shinkansen's speed!

Pic 2: This is how the wheels came like in the box

Pic 3: Removed the protective cover and there's the wheels!

With the wheels, I'll be choosing a staggered wheel format; i.e. the rear will sport a bigger width. Yes I'm aftering that FR look on the ER34. :)

These wheels will be wrapped with tyres of the below sizes:-
Front - 225/40/18
Rear - 255/35/18

What tyres you ask? Well I had a few choices in mind. Will blog about that after I fitted them onto my car. So stay tuned for that ...... :P

I also took the opportunity to weigh the wheels on my trusty electronic scale. The front weighs 10.7kg each while the rear weighs 11kg each. Not exactly light but hey ... it's not a NISMO wheel ok? So can't complain too much there.

The wheels I procured is bronze in colour (Colour code: MHG). It's also available in Chrome (WMB), Metallic Grey (MGS) and white (WHT). I choose bronze because I felt it looks best on the ER34's white QM1 factory paint. Co-incidently, my previous Prodrive GC-06 wheels on my previous car is also of the same colour.

Pic 4: Work V29R2 wheel valves

I'm utterly surprised that the wheels came with the Work V29R2 wheel valves. The are anodised in a nice cool blue colour. These will set one back JPY 1,500 if I'm not mistaken. The centre cap is optional and costs JPY 3,000. I did not get the center cap though. I prefer the centre hub exposed ... it gives that racy look to the car.

Initially I was slightly dissapointed with the wheels as I thought the deep dish would have been deeper but guess I'll have to get a different offset if I had wanted that. The size and offset that I got was actually the recommended specifications for the ER34 from Work Company Ltd itself, so I guess one can't go wrong with that.

More pics below. So what do you think of the wheels???

Pic 5: Work Emotion XD9 wheels

Pic 6: A closer look. Those decals are fluorescent and glows in the dark!

Pic 7: Embossed WORK logo

Pic 8: Fat wheels?

Pic 9: All 4 wheels together

Pic 10: Warranty card and information booklet

Rays Engineering lightweight Duraluminum lug nuts

Well, with my soon-to-be-installed Work Emotion XD9 wheels which leaves the lug nuts exposed, I can't be using the stock ones which looked pretty crap eh? :P

Pic 1: Rays Engineering Duraluminum lug nuts

Pic 2: Rays Engineering Duraluminum lug nuts

So I got myself a set of the lightweight forged Duraluminum lug nuts from Rays Engineering. These lug nuts are extremely strong and ultra light. It's only 0.8 oz each! (about 22.6 gms).

The Rays lug nuts also feature one 7-sided lug nut per wheel. These heptagonal nuts look stock from a distance, but can only be removed with the specially designed socket that comes with the set. These will act as the lock nuts to protect the wheels from theft.

The lug nuts are available in anodized red, blue, or black. I got the blue ones. Afterall, it matches the blue Work V29R2 wheel valves and my blue painted Sumitomo calipers. :P

For the ER34, ones have to ensure to get the correct specifications, which is the M12 X P1.25 thread size.

Will update when I get my wheels and lug nuts installed.

Stay tuned.......

Pic 3: Top view of the lock nut

Pic 4: Front end of the lock nut

Pic 5: Rear end of the lock nut

Monday, May 14, 2007

NISMO Oil Filler Cap

Pic 1: NISMO Oil Filler Cap Packaging

Pic 2: NISMO Oil Filler Cap (Front)

Pic 3: NISMO Oil Filler Cap (Rear)

There's nothing wrong with the stock oil filler cap but since I was in Japan and impulse buying got the better of me, I ended up with the NISMO Oil Filler Cap (Part No. 15255-RN012).

Removed my stock ones and in goes the NISMO unit. It's made of solid billet and enhances the engine's appearance quite a bit, eh? :P

Pic 4: NISMO Oil Filler Cap installed

Pic 5: A closer view

Pic 6: This is the stock version

Friday, May 11, 2007

Polarg B1 Hybrid M4 Bulbs

Pic 1: Stock factory yellowish side marker lights

Pic 2: Stock factory M4 bulbs

The ER34 comes stock with the run of the mill bulb for the side markers. It's yellow in colour and looks a bit out of place next to the bright white HID beam that the headlight throws out.

I wanted to replace it many months ago but did not get to do so because I was lazy to look for a good replacement; and I had doubt I will be able to find something that will fit my expectations.

Pic 3: The Polarg B1 Hybrid M4 Packaging

Pic 4: Comparison between factory and Polarg M4 bulbs

But lo and behold, one fine day I come across a set of M4 bulbs from Polarg (Part No. P8713W). Now this is good quality bulbs from Japan. Got a set of the 12V 5W M4 bulbs and replaced my old set. The blubs is blue in colour but actually gave out white lights.

It's pretty simple to install actually, yank out the bulb socket, pull out the stock bulbs and insert the Polarg version in. Job done in a couple of minutes. Oh by the way, I saw some PIAA variants and those are LED versions that costs like 9 or 10 times more than what I had procured. Go figure..... :O

Here is how it looks like.

Pic 5: Polarg M4 12V 5W bulb

Pic 6: Side marker fitted with Polarg bulb

Thursday, May 10, 2007

NISMO Shift Knob & Hippo Sleek Carbon Fibre Look Boot

I got myself some bling for the interior. What started off as a search for a replacement cover for the handbrake lever turns out more than the initial plan. Instead got 3 items to dress up the interior of the ER34 just a tad 'lil bit.

Got myself the below:-
1) Hippo Sleek Carbon Look Handbrake Lever Boot
2) Hippo Sleek Carbon Look Gear Lever Boot
3) NISMO Shift Knob (Part No. 32865-RN007)

Pic 1: Hippo Sleek Handbrake Lever Boot

Pic 2: Hippo Sleek Handbrake Lever Boot

Pic 3: Hippo Sleek Carbon Look Gear Lever Boot

Pic 4: Hippo Sleek Carbon Look Gear Lever Boot

Pic 5: NISMO Shift Knob

Pic 6: NISMO Shift Knob

The Hippo Sleek Carbon Look series covers the Handbrake Lever Boot, Gear Lever Boot and the armrest/centre console cover. I only got the 1st two items for my ER34. These stuffs looks really cool. Almost look like the fabric version of carbon fibre. Can't get 'em here anywhere in Malaysia. :P

To install the items, I removed the whole centre console. There's two pieces in total. One piece around the gear lever and the other one is the huge piece that runs to the rear of the car (which includes the armrest as well).

With the whole centre console off the car, one can then start to remove the stock items and replace it with the Hippo Sleek version. Not really tough to do but just a little bit time consuming to ensure all is fitted well and proper.

After refitting back the console, in goes the NISMO Shift Knob (Part No. 32865-RN007). The knob is made out of Duracon and fits screw size of 10mm and 12mm. I got the black colour version to withstand heavy usage better. The package even comes with shift pattern stickers (5 speed and 6 speed). Did not use them though. :)

You can't imagine how nice the NISMO Shift Knob feels. It's sort of like were moulded to fit your palm spot on. Excellent stuffs!!

Here are some pics of the install.

Pic 7: This is how it looks like from the factory

Pic 8: Remove the gear shifter cover

Pic 9: Gear shifter cover out

Pic 10: Gear shifter cover assembly

Pic 11: Got to remove the bracket that holds the original boot cover in place

Pic 12: The three little things that holds the boot cover

Pic 13: Hippo Sleek Carbon Look Gear Lever Boot on the Gear shifter cover assembly

Pic 14: Hippo Sleek Carbon Look Gear Lever Boot with NISMO Shift Knob

Pic 15: Centre console removed

Pic 16: Centre console with stock handbrake lever boot

Pic 17: Centre console with Hippo Sleek Carbon Look Handbrake Lever Boot

Pic 18: All Done. Hippo Sleek and NISMO items to bling out the interior

So what do you all think? I hope it's not too ricey....... :O
Related Posts with Thumbnails