Friday, September 29, 2006

The drifter in me does not exist....

Well, today was feeling kinda below the wind (upset la), thus while driving decided to do something to bring a grin to my face (read as stupid). While approaching a sharp u-turn, I turned off the TCS (traction control system) and did a flick into the corner.

The tail swung out wildly and I'm oversteering to the curb on the left side of the road. Countered the steering and now I'm heading to the right curb. Basically, the car went from left to right to left to right and back to the left again before it manages to finally go straight. My heart beat goes to like 100 beats per minute during that time, a little longer and I just might have a cardiac arrest. :P

The above is called Choku-Dori (yes it's Japanese) which is a slow side-to-side feint like drift where the rear end sways back and forth down a straight road. In my head, I was already begging the almighty to save this poor soul's ride from suffering a broken bumper, a dent rim and a possible dent suspension arm. :O

Thank god I did not hit anything and the car 'escaped' unscratched. Phew......what a relief.
*wipes off cold sweat*

After that, needed some calming. Pop in my Fish Leong CD for some good tunes for the rest of the journey home. :P

Drifting? Nah, maybe not for me. Or I just plainly suck at it. Hahahaha

Thursday, September 28, 2006

Boost Pressure Sensor Hose Fixed!!

If you have read my post dated 15th September 2006 (here) on the boost pressure sensor hose, it had split at its edges and dislodged from the inlet to the sensor housing. Sigh.....

Pic 1: Boost sensor housing with angle spanner

Finally I got it fixed via a RM 5.00 (USD 1.30) angle spanner. :P
Firstly, I trimmed out the split edges via a scissor. Then the bolt that holds the boost sensor housing in place is removed. Slot in the hose back into the housing and for good measure, I zip-tied the hose to give it some extra hold/strength.

Pic 2: Zip-tied the hose for extra durability

Hopefully, this will not re-occur else I'll have to get the darn hose replaced. Anyway, now I have a functional boost meter back.

* Beams with joy * :D

Monday, September 25, 2006

In Car Entertainment in the ER34

Pic 1: With new ICE installed

Well, finally got to change the sound system that came with the car. The stock unit is adequate but not good enough. The worst part is that in Japan, the FM broadcast band is 76 to 90 MHz, unlike what we have here in Malaysia that goes from 87.5 to 108.0 MHz. Without a FM Booster installed, the radio is practically useless to pick up radio stations locally.

In stock form, it comes with the below:-
1) Nissan branded CD Player with 6 disc changer
2) Nissan branded Casette Player (Geez...who uses casette anymore?!?)
3) Sanyo 6" front speakers
4) Sanyo 6" rear speakers

From my parts bin salvaged from my previous ride, I installed the below into the ER34:-
1) Eclipse E7703AVX – Head Unit
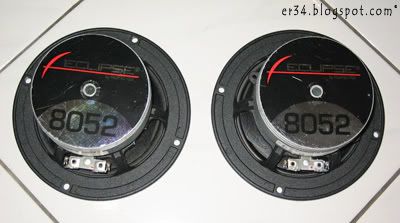
2) Eclipse 8052 5" Mid – Fr Speakers
3) Eclipse Passive Crossovers
4) Eclipse 3/4" Tweeters
5) Epsilon ESQ 75.4 4 channel Amp 75W

Pic 2: Eclipse E7703AVX

Pic 3: Eclipse 8052 5" Mid


Pic 4: Eclipse 8052 5" Mid

The head unit is capable of playing CD, DVD and mp3. It even has a slot for the Sony Memory Stick. Kinda cool eh? :P
As I like my dash to be practically clean and OEM looking, decided to mount the tweeters under the dash hidden from view. How come I never thought of this when it was in my PV6??? Damn!!

Pic 5: Eclipse tweeter under the driver side dash


Pic 6: Eclipse tweeter under the passenger side dash

As for the Epsilon Amp, it's slotted under the drivers seat while the Eclipse Passive Crossovers are tucked under the front passenger seat. Yea, all hidden from view and most importantly left my boot clean and tidy. I dislike my boot to be cluttered with bass tube/box and amplifiers. I like it void of unnecessary items...... :)

Pic 7: Epsilon ESQ 75.4 4 channel Amp 75W under the drivers seat

Pic 8: Eclipse Passive Crossovers under the front passenger seat

I left the rear speakers intact as it is until I can find the budget to change it to something better. Now with the above installed, I can finally listen to radio stations and play my favorite tunes on my CDs. The only downside is that the stock rear speakers can't take the load and the sound quality is kinda flat. I need more BASS!!!

Sigh....anyone got any good set of 6" for sale??? :D

Friday, September 15, 2006

Boost Pressure Sensor Hose

Last whole week I was in South Korea for a business trip. Spent time in Seoul, Asan and Jeju Island. A week away and it's amazing that I don't really miss the ER34. Hmm.....perhaps the trip was kinda nice and enjoyable. :P

The moment I got back, the urge to start the ER34 up was too great. Went to look 'her up and took it out for a drive. Arghh.........simply heaven to power it around town. BUT wait a minute, 15 mins into my drive noticed that the boost meter was not moving. Oh darn it. Parked the car, popped the hood and ...............??

The turbo pressure sensor hose has split at it's edges and dislodged from the inlet to the sensor housing. This is the second time this has happened and it's beginning to irritate me. Hmm.......I think I'll just trim away the edges and continue using it rather then getting those high end silicone hoses as replacements. Hope it'll last me this time round.

Now I'm having trouble inserting in the hose. Can't get the hoses in without removing the sensor module. And I can't get the darn sensor module removed, not enough space to remove the freaking bolt.
TENSION!!

Wednesday, August 30, 2006

Tein Super Street Damper Review

Well, it's almost a week that I had the Tein Super Street Damper with Pillowball Uppermounts installed into the ER34. The specification says 16 point adjustments but when I tried it out, it has 26 clicks in front and 30 clicks at the rear. Shrugs....


Pic 1: Stock dampers with HKS Lowering Springs

Upon removal of the stock UNISIA JECS dampers and HKS springs, it's apparent how bad the right rear damper is. It has practically leaked dry and the shaft boot had multiple torn on it due to the severe beating it had to endure. Hitting the bump stop day in day out is not too healthy you see.

Pic 2: Torn rubber boot

After installation of the Teins, I tried 15 clicks up front and 17 clicks at the rear. Went into KESAS highway
with it and felt quite comfy. It's probably felt slightly uprated as compare to the stock suspension.

Pic 3: Teins installed in front

Pic 4: Teins installed in front

After a couple of rounds, decided to swing into a rest area of the highway and adjusted it firmer to 17 clicks in front and 20 clicks at the rear. This is probably 2/3 of the stiffest setting on the coilovers. Now this is a better setting. The ride is firm and the damping is just slightly on the stiff side. Perfect for daily driving and the occasional enthusiastic driving.

Pic 5: The rear Teins waiting to be installed.

As for ride height, it's now sits just a tad bit higher than before. Those darn HKS Lowering springs it had before the Teins were really low. Scraped some sleeping policeman (speed humps/breakers) with it. This setting is just nice!

Pic 6: Teins installed at the rear

Pic 7: Teins installed at the rear

I'm beginning to grow on these set of Teins. Very appropriate for street use. No wonder it's called Super Street!!! Hehehe


Anyone wanna purchase my used HKS Springs??

Thursday, August 24, 2006

Tein Super Street Damper with Pillowball Uppermounts


Yup. Got hold of the Tein Super Street Damper with Pillowball Uppermounts. Opened out the package like a 5 year old tearing apart the wrappers of a Christmas present. :D

Pic 1: Nicely packed in a box

Pic 2: Part Number on box ID

It comes nicely packed in a box with the coilovers carefully separated inside the box via dividers. The box comes with the below:-

1) Front upper mount x2
2) Rear upper mount x2
3) Front shock absorber x2
4) Rear shock absorber x2
5) Main spring x4
6) Wrench x2 (For height adjustment)
7) Damper force adjustment tool X1
8) Rust-proofing (50ml) x1
9) Installation instruction manual x1
10) Feedback form X1
11) Novelty kit x1 (Tein stickers and emblem)

Pic 3: The contents of the box

Pic 4: Pillowball uppermounts (note rubber lining)

The good thing about getting the GSN62-B1SS3 model instead of GSN62-A1SS2 is the inclusion of the pillowball mounts. Initially I was actually looking for the one without in fear of noise intrusion into the cabin. But after learning that this model comes with a rubber ring on top of the metal mount, noise shouldn't be a problem.

The other bonus is that it is compatible with EDFC (Part No. EDK05-12120) in case I wanted to add that in the future. With the EDFC, I'll be able to adjust damping rates on the fly inside the car!

Pic 5: Front damper

Pic 6: Rear damper

The springs on both front and rear has an ID of 7.0 with spring rates of 5.0kg/mm in front and 4.0kg/mm at the rear. It'll drop the ride height to -45mm up front and -35mm at the rear.

Pic 7: Front Spring (C050-GJC1)

Pic 8: Rear Spring (D040-GIC)

I have yet to install the coilover yet but will most probably use the factory setting first to gauge how it feels like. The recommended ride height adjustment range is -65 to -24mm for the front and -55 to -17mm for the rear.

Will provide a review once I install it into the ER34.............

Can't wait for it!!! (Rubbing hands in glee.)

Wednesday, August 23, 2006

Dead Rear Damper Part 2

Well, the search continued on for the elusive ER34 stock rear dampers. I reached the point where I can't stand the darn knocking sound created from the rear dampers hitting the bump stops. Thus in the end, I decided to look for brand new replacements.

I did countless searches and obtained many quotes from the Internet to get either the below:-

Spring Rates: F6.4km/mm & R4.6kg/mm

1) Nismo G-Attack S Tune (Part No. 5300S-RSR40)

Spring Rates : F5.0kg/mm & R4.0kg/mm

2) Tein Super Street Damper with Pillowball Uppermounts (Part No. GSN62-B1SS3)
Spring Rates: 7.0kg/mm & R5.0kg/mm

3) HKS Hipermax II (Part No. 1760-SN013)

Apart from the above, I also looked at building a custom unit from Australia with Bilstein shocks and Whiteline Spings.

All the quotes were actually quite good but the cost to get it delivered to Kuala Lumpur, Malaysia is hefty due to its weight of 32 kilograms. Insurance and handling fee are manageable.

In addition, it will take at least 3 weeks to reach here from Japan/Australia and I might have to deal with taxes from Customs as well.

In the end, I narrow down my choice to the Tein Super Street Damper with Pillowball Uppermounts due to it receiving rave reviews from users around the world. Today I went shopping at the local speedshops. Went to quite a number of shops and found one that has it in stock BUT it was sold just last week. Damn!!!

After looking around somemore, it's actually quite amazing that someone else actually stock a set of the Tein Super Street Damper. Cool!! Ready stock and I can get it there and then. Screw the time consuming task of importing one in ownself. I can get it fitted in a couple of days time and be inspired to corner without worries!!

PLUS today is my Birthday and it's nice to pamper oneself with a gift, no? :P

(I'll worry about the credit card bills later. Hahahaha.....uhm.......)
Related Posts with Thumbnails