Monday, February 21, 2011

Fuel Leak !!!


Pic 1: Leaky injectors

Some time after my stage II mods, fuel smell inside the ER34 has become a norm. I took to it as nothing more than perhaps running a wee bit rich, hence the strong odour. Didn't really give much thought to it as I have a blocked nose most of the time. The little amount of passenger that the ER34 ferries would often comment on the strong odour whenever they board the car.
I couldn't really be bothered because, well ..... fuel smells great to me! It's a natural high for us petrol heads. :P

What is getting a tad worrisome is that the smell is getting stronger, so much so that people standing outside of the car would get high and start doing the chicken dance. Ok I exaggerated a little bit here but you get the picture.


Pic 2: Can see the fuel stains

So anyway, I decided to take a look at what's happening under the hood. Using my nose like a blood hound, I sniff my way around the engine bay and it lead me to the centre of the engine bay. Lo and behold, those damn injectors are leaking fuel. All 6 injectors are leaking via cracked o-rings!


Pic 3: O-rings are indeed in a bad shape
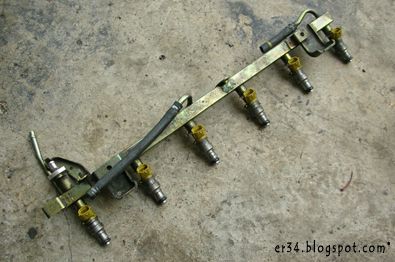
Now this sucked big time, I was scratching my head on where to find replacement o-rings. Order from SARD? I bet it will be ridiculously priced! Luckily one of my contact knows where to get it and promptly ordered some for me locally. With the o-rings replaced, the injectors are back to normal and no more fuel leakage.


Pic 4: New o-rings were fitted and the injectors were mated back with the fuel rail


Pic 5: In goes the fuel rail and injectors

A quick check around the fuel lines also leads to another leak. The Tomei fuel pressure regulator is leaking where the fuel lines joins the fittings. A quick change of fuel lines and new banjo clips solved that pretty quickly.
After the above drama, the ER34 is now back to normal and hey no more fuel smell! Woohoo!

Is that the end of the ordeal? Hardly unfortunately. Strangely enough, a week later when I started the ER34 in the noon for a lunch appointment with alvint, it reeks of even stronger fuel smell. This can't be right at all. Pop open the hood and tracing the fuel lines, I saw fuel literally dripping off from the fuel rail adapter plate. Oh man, I can't drive the ER34 with it leaking fuel like that, I might end up with a big bang and have a burnt wreck as a car after that!

Took out my tools and gave it a couple of quick turns to tighten the banjo clips. This will serve as a temporary measure while I drive out to my mechanic's place to get new fuel lines and also a new banjo clip. Problem has since been solved and the ER34 has been running fine for a couple of weeks now. Phew! Lucky that is solved finally!


Pic 6: The Tomei Fuel Pressure Regulator were also leaking

Friday, February 11, 2011

TCS and SLIP Light ON


Pic 1: TCS and SLIP light

Recently, my TCS and SLIP light lighted up permanently whilst driving. Needless to say, it's bloody annoying to see the light on my dash and what is more worrisome is that my TCS isn't working. Not a good thing as it's been raining a fair bit recently.


The problem is pretty erratic. Sometimes it lights up other times it does not. And when it lights up, it'll be gone after I stop the car and restarted it.

I've seen and heard of this problem before and a simple fix is to remove out the TCS module and give it a good cleaning and it should all be fine and well. Did just that and it has been fine for the past 4 weeks. Fingers cross that I do not see the some problem cropping up again. :)


Pic 2: TCS module. There's a butterfly flap in there.


Pic 3: Inside the module


Tuesday, February 08, 2011

97,000km Service


Pic 1: Time for new fluids

Just did my oil change recently. The ER34 has now clocked 97,000km and in goes the usual Torco SR1 10W-40 engine oil and of course the obligatory Nissan engine oil filter (Part No. 15208-53J00). Feels good to have fresh fluids inside the RB25DET NEO again. :)


Monday, January 31, 2011

Gohtong Jaya Drive with the MSC #01


Pic 1: Heading towards Ulu Yam

The Malaysian Skyline Club had a drive to Gohtong Jaya via Ulu Yam road yesterday. Now it has been ages since my last drive (approx. 6 months ago!) thus was looking forward to do some driving. I've already decided not to push it like last time due to the ER34 having fresh tyres, fresh brake pads and also just had the rotors skimmed. Well PLUS I am a much slower driver nowadays, getting old might have got something to do with it, and also with a little one on tow does have its effect. :)

Anyway, I reached the rendezvous point at 6:30am only to see a huge gatherings of Alfa Romeos that are heading up the same route as well. As they start to move off, the rest of the Skyline chaps arrive in great numbers. There were a mix of cars from Skylines, Silvias, Pulsar GTi-R, Cefiros, R35 GT-R, Lancer Evolutions, 300ZX, etc....


Pic 2: Regroup before the cable car station


Pic 3: Regroup before the cable car station

How many cars? Gosh I really don't know man. It's a huge turnout!


The weather was not on our side this morning as it was raining pretty heavily on some stretch and the roads were soaking wet! It's at this point that I am glad I shod the ER34 with Goodyear Eagle F1 Asymmetrics. These were great in the wet!

Even in these adverse conditions, some of the front runners were really gunning it mad. I couldn't even catch a glimpse of them. Naturally in such a big group, the cars broke into two groups pretty soon. Those that are ahead and those that are a a little bit behind.


I stayed with a bunch of cars throughout comprising of R32s, A31s, Z31, R35 and some R34s. It's quote entertaining to watch those R32s drift round the wet corners ahead of me. Good stuffs!

The final destination of
the Cable Car station was reached pretty quick. This is where we grouped up for a much deserving breakfast before the group start to move off back home individually and in small groups. Nothing much to report on thus I'll just proceed with some pictures of the day.

Enjoy!


Pic 4: Regroup before the cable car station


Pic 5: Regroup before the cable car station


Pic 6: Regroup before the cable car station


Pic 7: Yes it was really raining mad!


Pic 8: Yours truly


Pic 9: Slammed RPS13


Pic 10: The dorifto guys


Pic 11: Sexy and very rare Pulsar GTi-R


Pic 12: Probably the most awesome BCNR33 in the country


Thursday, January 27, 2011

Shod the ER34 with Volk Racing TE37 and slap on the Endless brakes??

This month seems to be the topic of footwork for the ER34. We've been talking about tyres, wheels, brakes and suspension. :)

Well, since we are at this topic, let me wrap up this month's blog entry on the discussion of possible replacement wheels for the ER34.

What got me thinking was that the good folks at JDM Auto Link have a set of used Volk Racing TE37 enroute from Japan. What's so special about the wheels is that it's finished in one of RAYS optional colour.

The standard colour of TE37 is just bronze and white. I mean, only two colours? Yes, only two colours are available off the shelf. However, they do carry some optional colours which needs to be ordered from their factory. The list of optional colours are:-

Optional Colours:
Mercury Silver
Platinum Silver
Titanium Gunmetal
Hyper Flat Black
Diamond Black
Takata Green
Gold (aka Top Secret Gold)
Magnesium Blue
Orange
Chameleon Blue/Purple

And they also have some special edition colours as below:-

Special Edition:
Black Time attack with red lip TE37 only
Seibon edition (similiar to black/red time attack) TE37 only
Silver Green time attack TE37 only
Blue Yellow time attack TE37 only

Before we go into the specs of the possible new wheels, let take a look at my journey from the stock ER34 wheels to my current
Work Emotion XD9. I took me a long while to decide what wheels to shod the ER34 with in order to ditch the fugly standard items.

After many hours, days, weeks, months of research, looking at pics, etc ..... only then I decided to go for the
Work Emotion XD9. I was very careful with my wheel order, thus with advise from Work I got the recommended specs for the ER34. Now lets look at what difference did it make to the ER34 on stock versus the Work Emotion XD9.

Stock ER34 wheels specs:-
17 x 7.5J PCD +40 - Front
17 x 7.5J PCD +40 - Rear

Work Emotion XD9 specs:-
18 × 8.0JJ+35 - Front
18 × 9.0JJ+38 - Rear

With the switch to
Work Emotion XD9, the ER34 had the below changes:-

FRONT
Inner Clearance: 1mm LESS
Outer Position: EXTEND an extra 11mm

REAR
Inner Clearance: 17mm LESS
Outer Position: EXTEND an extra 21mm


Pic 1: This is how Volk Racing TE37 in Mercury Silver looks like

Now if I shod it in with the Volk Racing TE37s that have the below specs:-
18 X 8.5J+30 - Front
18 X 9.5J+40 - Rear

The ER34 will have the below changes from what it is currently:-

FRONT
Inner Clearance: 1mm LESS
Outer Position: EXTEND an extra 11mm

REAR
Inner Clearance: 8mm LESS
Outer Position: EXTEND an extra 4mm


After checking my wheels yesterday, I have the extra space up front and rear to move the wheels outwards a bit. That means those Volk Racing TE37s will be perfect for the ER34. PLUS I will be able to fit in my Endless 6 pot brakes. Woohoo!!!

But but but I have not really decided to go for it tho. Decisions ..... decisions. I am still ok with selling off my Endless brakes at this moment. So yeah, in a bit of a dilemma now. :(

Well if you are interested in those wheels, you can check it out with JDM Auto Link. :)


Sunday, January 23, 2011

Tein Super Street Re-adjustment

Previously, ER34 somehow handled a bit weird when it's flung around long sweeping bends. Somehow it felt a little bit unstable and not as planted as before. It has been a long while in that condition but the silly me just shrugged it off as perhaps due to my worn tyres.

However, after I changed to the new tyres, the problem still persists. There must be something wrong. What could it be? I decided to check my damping on the Tein Super Street as the first step.


Pic 1: Just a quick turn clockwise to set it to the hardest

Horrors that be, the front right side was set to the softest while the left side was set to the hardest.
Some low-life idiot must have decided to tamper with my damping adjustment!!! Damn it, no wonder it felt weird. This must be the handiwork of some itchy hand fellows while the ER34 was at the workshop. &%$#@!*

Well, since I'm readjusting it, I set it all round to the hardest setting. I mean the current setting was perfect for me. A good trade off for daily normal commute and the occasional spirited drives. But I wanted to try something a little bit harder. Think of it as a prelude to see how I can take it if I decided to upgrade to something from the Tein catalogue.

The verdict? The ride now is very firm and bordering to being uncomfortable for daily usage but I'll stick to it now and see how it goes. I think it'll grow on me. :)


Tuesday, January 18, 2011

Fitted in - Goodyear Eagle F1 Asymmetric

After the brakes are done, it's time to shod on new shoes. Can't wait to wrap the wheels with Goodyear Eagle F1 Asymmetric and have more confidence in driving. The old Yokohama Advan AD07s were pretty much worn down already.


Pic 1: Three tyres in the car


Pic 2: Last piece in the boot

I was having doubt on the transport of the tyres from my house to the shop. I had to do it using the ER34 you see. BUT amazingly it fits in well ..... except that one of the tyre kept on interfering whenever I need to use second gear coz it kinda blocks the shifter it from entering 2nd. Had to push it away whenever I engage 2nd gear. LOL :D

Now who says a 2 door car can't be practical? Hehehe


Pic 3: The old Yokohama Advan AD07

At the shop, after taking the tyres off, one can see that the old tyres were worn pretty evenly all round. It's good testament to the chap that adjust my suspension geometry. I had them on for 18,000km and just did one rotation in between. Nice job!


After fitment the wheels were balanced off-wheel and then fine tuned on-wheel. Gives the best accuracy. The rest were SOP as per before on the old skool machine. I like!

So now with skimmed rotors, new brake pads and new tyres, I have to rake in the miles to run them in properly before I start pushing the ER34 around. Problem is I don't travel around much distance so I guess it's gonna take me a while for this to be done.


Pic 4: Fitting in the new rubbers


Pic 5: Fitting in the new rubbers


Pic 6: Old skool method for me


Pic 7: Old skool machine


Pic 8: Time for the rear


Pic 9: On-wheel balancing


Pic 10: Goodyear Eagle F1 Asymmetric thread pattern

Related Posts with Thumbnails